


Introduction
Microscopes often represent a significant investment of funds and are sophisticated optical instruments that require periodic maintenance and cleaning to guarantee successful microscopy and perfect images. When neglected, exposure to dust, lint, pollen, dirt, and failure to remove immersion oil in a timely manner can seriously damage optical performance. Over the years, a variety of cleaning procedures have been recommended, but many users remain unsure as to which of these will yield the best results. The choice of the best cleaning method depends on the nature of the optical surface and the type of substance to be removed.

A microscope that remains unused for a long period of time can accumulate dust and debris from the air, which can lead to deterioration of image quality even though the instrument may be practically new. Even when carefully covered for protection during periods of inactivity, however, microscopes that are used regularly are subject to build up of contaminants. Some of these are unavoidably introduced from the environment and others by the microscopists themselves, especially in areas where the hands, eyelashes, and even moisture from breathing contact the instrument over time. The critical areas include:
- The external surface of the front lens of the objective
- The surface of the camera sensor and its protective glass cover
- Both surfaces of the cover slip
- The surface of the microscope slide
- The surface of the camera adapter optics
- Surface of the upper lens of the condenser
- The outer and inner surfaces of the eyepiece as well as the upper surface of the reticule
- The outer surface of any protective glass covering openings through which light exits
- Other glass surfaces in the light path such as halogen lamps, high pressure arc-discharge lamps, fluorescence filters and beam splitters, collector lenses, or contrast and heat filters
Some optical surfaces are more sensitive to dirt than others. The front lens of the objective is particularly significant, as when the optical elements at or near the conjugate field (image) planes are dirty, damaged, or defective, artifacts are likely to appear in sharp focus superimposed on the specimen image (see Figure 2). Ironically, the higher the quality of optical components, such as the condenser and collecting and relay lenses, the more these blemishes interfere and contribute to optical noise. Before every critical use, check the front lens of the objective for dirt.
For any dry objective, the smaller the free working distance and the smaller the surface area of the concave front lens, the greater the danger of soiling the front lens with embedding media, immersion liquids, or dust. The front lens of an immersion objective should be cleaned to remove residue both after use and before applying fresh immersion liquid. The mixing of different immersion media, as well as different lots of the same medium can result in blurred images. Though the utilization of immersion oil is essential in maximizing microscope optical performance, its improper use or the failure to immediately remove the oil after each use constitutes the most serious contaminant that must be dealt with in instrument maintenance, and thus will be discussed in further detail in a later section.

Microscopes that are equipped with digital cameras may develop a degradation in captured image quality or exhibit image artifacts caused by accumulation of contamination either on filter elements that are sometimes utilized in the camera adapter or on the optical glass window that may be incorporated to seal the camera housing and protect the charge coupled device (CCD) or complementary metal oxide semiconductor (CMOS) image sensor. In practice, if dark specks or similar in-focus artifacts are observed in digital images, and they are not in the specimen plane, their most likely cause is particulate contamination on the image sensor or an associated filter surface. The cameras always need to be handled with the utmost care and protected from dirt according to the manufacturer's recommendations.
back to top ^Dirt and Debris
Familiarity with the best possible results obtainable with a specific technique and procedure permits a user to recognize the consequences of dirty optics. The ability to compare the expected image and the image actually obtained with respect to optimal sharpness, contrast, and the absence of contamination-dependent visual artifacts allows the user to immediately recognize when the microscope is dirty or not. If the image sharpness or contrast is not optimal, then there is a high probability that the microscope optics are not clean. In order to determine the location of the dirt, proceed as follows:
- Carefully rotate objectives and cameras a small amount within their thread.
- Check the slide and cover slip by moving the specimen while focusing initially on the upper and then the lower surfaces.
- Check the condenser while moving it up and down and if applicable, by swiveling the front lens slightly.
The affected optical surface is identified when a suspected optical component is moved and the dirt follows this movement. The single exception to this rule is the camera. Dirt located within the camera (usually on the optical window protecting the image sensor) will not move when the camera is moved. A macroscopic check for larger dust particles and scratches on optical surfaces can be carried out using either a magnifying glass (with a magnification of 3x to 6x) or an eyepiece viewed through the reverse aperture (in effect, peering through the opposite end of an eyepiece). A soiled objective front lens is easily identified by examining an evenly lit surface through the rear aperture of the objective. The internal lens organization produces an enlarged image of the smallest contaminants present on the external surface of the front lens. The final check should always involve an assessment of the improvement in image quality.
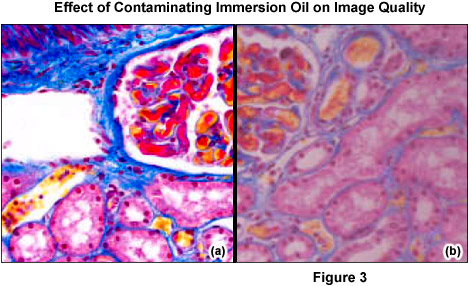
It is crucial to differentiate between dust (for example, glass dust from slides, flakes from skin of the microscopist, fibers from clothing, pollen from spring and summer flowering) and other dirt (liquid or dried-out embedding or immersion media (see Figure 3), culture solutions, residue from improper cleaning attempts, fingerprints and grease). Dust particles can either rest loosely or can be more or less stuck to optical surfaces. Other dirt is either water-soluble or may only be completely removed using organic solvents. However, a blurred image may not always be due to dirt. Using an objective with a large numerical aperture in conjunction with a cover slip of the wrong thickness can result in blurred images (spherical aberration). Dry objectives of high numerical aperture normally have a correction collar, which permits compensation for the spherical aberration. Many highly corrected immersion objectives also require specially selected cover slips with a thickness of 170 micrometers, if the best image is required.
Immersion objectives should only be used in conjunction with a suitable, bubble-free immersion oil. Although the viscosity of immersion oil minimizes any immediate migration into unintended locations, if it is not removed promptly and is allowed to accumulate, the effects of gravity and capillary forces will ultimately result in the oil moving into parts of the substage mechanism and microscope stand, and perhaps even into the objective. This accumulation may not be readily visible, and can go unnoticed until mechanical or optical problems become severe enough to require service by a microscope repair facility. The occasional recommended use of the aromatic amine, anisole, as an immersion medium results in loss of sharpness and contrast. Anisole can attack the cement of front lenses, especially that of older objectives, and should be avoided.
back to top ^Optical Surfaces
Concave or convex surfaces (for example, the front lens of dry objectives and condensers or the eye-lens of some eyepieces) should be distinguished from planar-parallel or flat surfaces like the front lens of most of the immersion objectives, as well as condensers, filters, and the protective glass covering camera sensors or the opening through which light exits. Concave or convex surfaces are cleaned using either the cotton or the new polyester swabs as described in the next section. Easily accessible flat surfaces may be similarly cleaned with soft disposable cellulose wipes. Microscope optics can be composed either of optical glass, quartz, or polymers. The upper surface of almost all components will be coated with an antireflection layer to minimize stray light. Some of these coatings may be wipeable or not, due to their softness. Generally, antireflection coatings are composed of magnesium fluoride and should only be cleaned with agents free from ammonia and acid. Several alternatives to hazardous solvents have been found to be effective in microscope cleaning, and a variety of cleaning agents, as well as cleaning materials, are recommended by different microscopists and manufacturers. Some optical components are surrounded by black antireflection surfaces, which are sensitive to organic solvents. The plastic and rubber parts of the eyepiece will likewise be attacked by organic solvents, including acetone, methylene chloride, and chloroform.
One of the most significant dangers with many of the solvents proven effective for cleaning microscope optics is that they have the potential to dissolve the cements utilized in lens assembly (as do the immersion oils themselves if allowed to remain on the optics). In older microscopes, lenses were cemented using an alcohol-soluble cement such as Canada balsam. Benzene was regarded as a highly effective lens cleaning solvent at the time, but always required great caution to limit contact with the lens for no more than a second or two, due to the high solubility in benzene of balsam and some other cements used for lens mounting (and for mounting coverslips on specimen slides). It is known that benzene is readily absorbed through the skin, (this as well as inhalation of the vapors can cause liver damage) and the most common lens cements are generally composed of synthetic polyacrylic resins, which are not alcohol soluble. Xylene has been widely utilized to clean optical surfaces for years, and though it is highly flammable, toxic, carcinogenic, and may cause skin contact sensitivity, xylene is still less aggressive than benzene. Both solvents are harmful to the mechanical and optical components of many microscopes even though they are recommended as lens cleaning solvents.
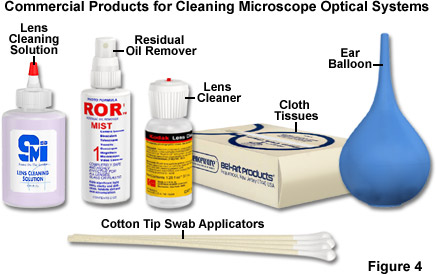
The proprietary solvents Histolene and Histoclear are gaining popularity as replacements for xylene in microscopy laboratories, and have been found to be effective for cleaning other instruments as well. Illustrated in Figure 4 are several commercial products designed for cleaning microscopes. Pure distilled water is the safest cleaning fluid for any contamination that is water soluble, but if that is inadequate, commercial photographic lens cleaning liquids are very effective and are safe for precision optics when used sparingly. Sometimes household glass cleaning agents, which contain dilute ammonia, are recommended but they should not be used routinely. The internal workings of the microscope, including the optical surfaces, components of the fluorescent filter sets, cameras, and camera adapters should never be cleaned by the user, but by experienced customer service representatives from the original manufacturer. The user should only clean the external surface of the objective front lens, the condenser front lens, the eyepiece eyelens, glass color and conversion filters, and the external surface of protective glass covering any opening through which light exits.
back to top ^Cleaning Agents and Procedures
The goal in cleaning microscope optical surfaces is to completely remove dust and dirt without leaving any residue of the cleaning agent or damaging the surfaces. The following equipment is required:
- Long, thin wooden sticks, preferably of bamboo (obtainable from Chinese restaurant suppliers) or a comparable, not too flexible material
- High purity cotton
- Absorbent polyester swabs for cleaning optical components
- Soft cosmetic cellulose tissue specifically designed for optical surfaces (Kimwipes are suitable for lens cleaning, but typical facial tissues contain hard particulates that are harmful to optical surfaces)
- Dust blower or ear wash bulb (laboratory suppliers, pharmacies)
- Distilled water
- Freshly prepared solution of 5 to 10 drops of a washing-up liquid in 10 milliliters distilled water
- Solvent for the removal of greasy or oily dirt, such as the Optical Cleaning Solution L (recipe of 85 percent petroleum ether, 15 percent isopropanol), pure petroleum ether (analytically pure, boiling point less than 44 degrees Celsius) or, exclusively for cleaning cover slips, pure acetone
For the easy cleaning of flat surfaces, such as the removal of immersion media from cover slips or the removal of immersion media from the front lenses of immersion objectives, soft tissue soaked in diluted dishwashing liquid is suitable. The smooth lens paper (so-called Joseph paper), which is often readily available in research laboratories, is not for cleaning but is intended only for the dust-free storage and protection of optical components. For cleaning purposes, this lens paper is too harsh; it also doesn't absorb the dirt effectively or quickly enough. High purity cotton cleaning tissue represents the single exception. For cleaning of all other optical surfaces, either freshly made cotton swabs, lens tissue, or polyester swabs are used.
Preparation of Cotton Swabs
Cotton swabs that are untreated are appropriate for microscope cleaning, and are commercially available, or may be assembled according to the directions below. Cotton wool, sold by pharmacies in rolls, typically contains some proportion of synthetic fibers, and is not as suitable for delicate surfaces as is 100 percent cotton wool.
- Wash hands (powdered, latex gloves are not suitable).
- Dip the stick into the cleaning solution (aqueous or organic solvent). The cotton fibers attach better to the stick as a result.
- Dab the stick onto the wad of 100 percent cotton and loosen some fibers. Do not compact the cotton otherwise the fibers will not separate easily.
- Turn the stick so that an even, elliptical cotton bud forms at the tip.
- To protect the cotton tip from dirt, the stick should be stored in a plastic sandwich bag. It should not be handled as perspiration and grease (from fingers) will significantly affect its ability to clean.
- Remove the cotton tip after every wipe and replace it with a fresh cotton bud.
- The stick can be used for a long period of time. Use separate sticks for water-based solutions and organic solvents.
- If the use of a high purity cotton lens cleaning tissue is preferred, fold the sheet around the stick so that a sharp point is generated. The point should not be handled. Use the tissue only once and then replace it. Polyester swabs can be used until they no longer clean well.
Cleaning Procedure
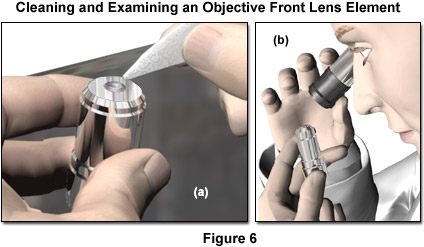
- Place the objectives, eyepieces, and cameras on a dust-free surface (fresh aluminum foil, for example). Before any cleaning is attempted, the optical surface should be inspected with magnification under reflected light to determine the condition of the component. Particular attention should be given to the presence of any particulate material, which must be assumed to be abrasive, and removed before any other cleaning is done. A magnifying lens of 2x to 3x (such as a loupe) is appropriate for examining larger optics such as oculars and condensers, while the smaller lens elements of objectives require approximately 5x to 10x magnification for proper inspection. It is crucial that particulate matter be removed from a lens surface as the first step in cleaning, because any particle can be abrasive and result in scratches if it is brushed across the surface with even the most gentle lens tissue. All other optical components to be cleaned should be as accessible as possible.
- Blow all loose dust particles away with a compressed gas duster, air blower, or a clean camelhair brush. Never blow dust off lens surfaces with a strong breath, and make sure to gently blow air across (not perpendicular to) the lens surface. The safest method of air dusting is to use a rubber bulb or balloon, such as models intended for use as ear and enema syringes for infants. Care is required to avoid touching the tip of the syringe to the lens surface. The best advice is to avoid any use of compressed air cans for lens cleaning. It is difficult with these to control the pressure of air impinging on the surface being cleaned, and there is always the risk of either extremely cold air or freezing liquid being expelled onto a lens surface and causing irreparable damage.
- Remove all water-soluble dirt with distilled water. If this step is unsuccessful, repeat using a solution of diluted washing-up liquid. Remove any remaining residue with a dry cotton swab, but breathe with an open mouth on the surface first to generate a film of moisture. In so doing, be careful to not spray droplets of saliva. An effective method of preparing lens paper for this cleaning method is to fold all four corners of a piece of tissue together, leaving the untouched center of the tissue bulging out. The corners can be twisted together slightly to form a stem for handling the tissue. When the tissue is held by this stem, and wiping performed with the puffed-out tissue center, the force that can be applied to the objective is limited by the springiness of the tissue. Circular wiping motion can be applied in this manner, with very little direct force on the lens surface.
- To remove oily dirt, use a solution of dilute washing-up liquid initially. If this action does not produce a satisfactory result, repeat the cleaning using a solvent (Optical Cleaning Solution L or petroleum ether). Greasy dirt must always be removed using a solvent. Dip the cotton or polyester swab into the cleaning solution and shake off excess liquid. An excess of liquid in a cotton bud will flow over the rim of the lens and attack the lens cement. This may consequently lead to the removal of the cement between bonded components. The solvent should remove as much dirt as possible. In order to increase the retention time of volatile organic solvents in the cotton bud, some users chill the solvent (-10 degrees Celsius to -20 degrees Celsius). Chilled solvents have a disadvantage. Due to their low temperature, condensation may form on the lens surface and leave a residue. A more suitable method to improve the retention time of a solvent is to add isopropanol.
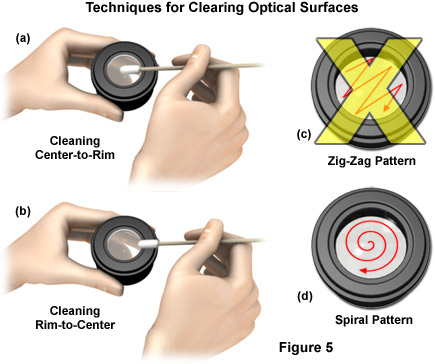
Cleaning is achieved using a spiral motion from the center to the rim (see Figure 5 for details about cleaning procedures). Never wipe using zigzag movements as this will only spread the dirt. Direct pressure from the fingers should never be applied to the glass lens surface in order to minimize the possibility of scratching the lens if any particulates are present on the tissue. With larger optical surfaces such as tube lenses, the spiral motion starts initially at the rim before moving to the middle and is only then followed by a center to rim cleaning motion. In most cases, several wipes are recommended, using a fresh tip each time.
Not all solutions can be used to clean the optics of a microscope. Some clean very effectively, but are either toxic (chloroform and acetone) or environmentally unfriendly (carbon tetrachloride), while others will leave surface residue (xylene, toluene, and diethylether). Residue forms quite easily with the use of xylene and absolute ethanol, as well as when the dirt contains water-soluble components. Acetone is recommended when oil and grease must be removed from cover slips. Acetone attacks most types of plastic as well as rubber, and as a consequence, its use to clean eyepieces can be problematic. In addition, acetone may attack cemented optical components such as objectives, camera adapter lenses, or eyepieces when used frequently. Acetone can also dissolve specialized organic coatings.
The painted external surfaces of modern microscopes are powder-coated and extremely durable. They can be cleaned well with a very lightly moistened microfiber cloth. Loose dust and other dirt can be removed using a brush of soft hair used exclusively for this purpose. Following complete cleaning of the mechanical components and carefully wiping up any liquid spills in the vicinity of the instrument, a small vacuum cleaner with a flexible hose and soft brush attachment can be employed to remove any loose material on the stand and table area around it. Extreme care should be taken to avoid touching any optical surfaces with the vacuum brush.
back to top ^Proper Use and Removal of Immersion Oil
Adhering to the following procedures in the use of immersion oil will significantly ease the task of removing the oil from microscope components before it causes damage. It is important to recognize that immersion oils are not inert with respect to either optical or mechanical microscope components, and if left in contact with the instrument, oil will penetrate into gears and sliding mechanisms and into crevices between lens elements and their mounting structures with the potential to cause irreversible damage.
The full utilization of the microscope optical system numerical aperture when immersion objectives are used requires a double oiling technique in which a single drop of immersion oil is applied to the top lens surface of the substage condenser and another single drop on the top of the specimen slide. Only a single drop of oil at each specimen-optical interface can be accommodated without producing contamination that may be impossible to remove without complete disassembly or factory servicing of the instrument. The condenser is then raised just to the point that the oil drop contacts the lower surface of the slide, and the objective front lens is brought into contact with the oil drop on top of the slide. It should be stressed that the oil immersion technique is only to be used with a condenser equipped with an immersion-type top lens, and with immersion objectives. Any attempt to improve the performance of a dry objective by application of immersion oil will likely result in its destruction, as such objectives are optimized optically for use in air, and are not sealed against the intrusion of fluids into the lens barrel.
After each specimen has been examined, the immersion oil should be completely removed, even if additional slides are going to be observed. Immersion oil is most safely removed using only lens tissue, without employing any solvents. Lens cleaning paper that is designed specifically for use on high quality optics must be employed, and it should be stored in a covered container to prevent contamination with airborne particulates. A folded piece of lens tissue (held under light tension with two hands) is drawn across the objective front lens to absorb the oil, and repeated with a new area of the tissue. This gentle wiping of the lens surface should be repeated with as many tissues as required until no oil streaks are seen on the tissue, and each tissue should be discarded immediately to avoid inadvertently re-using contaminated tissues on the objective. Using plenty of fresh lens tissues is essential to the success of this procedure. The natural tendency to minimize waste is misdirected, considering the relative cost of lens tissue compared to the potential of damaging an expensive objective.
When working with inverted (tissue culture) microscopes, the front lens of every objective will be more exposed to dust than that in an upright microscope; all long working distance dry objectives with magnifications between 10x and 100x need to be regularly checked. Inverted microscopes present special problems with regard to the use of oil-immersion objectives because spilled or migrating oil can very easily intrude into the interior of the objective at the juncture between the body and the telescoping spring-mounted front lens barrel. If oil is allowed to accumulate, it can conceivably flow, under the force of gravity, into the objective turret or nosepiece.
When there is no residual trace of immersion oil apparent on the final tissue paper, another tissue should be used to wipe the lens with moisture from the breath. As previously mentioned, one must not blow through closed lips onto the lens, but should breath gently on it with the mouth open so that no saliva droplets are expelled. This procedure should be repeated several times with a new tissue each time. Following cleaning of the optics, immersion oil should be cleaned from both surfaces of the specimen slide using laboratory tissues. All areas on the instrument, such as portions of the base or stand, should be routinely checked for any traces of immersion oil, which if found, may be removed with laboratory towels or soft cotton cloth.
Practical Considerations for Cleaning Microscope Optics
- When starting to clean, don't forget to use a dust blower except when fluids (such as immersion oil) must be removed.
- Never wipe lenses with dry swabs or tissue as this causes scratches!
- Do not use abrasive materials like leather wipes, dry linen cloths, or polystyrene sticks as recommended by some manufacturers.
- Do not apply any solvents before trying distilled water (a film of distilled water can be generated by breathing on the surface), except when grease is to be removed.
- Do not use ethanol or acetone for the cleaning of older microscopes.
- Do not use any disposable cotton swabs instead of the described cotton or polyester swabs, as the former are not free from contamination.
- Do not use any of the occasionally recommended metal rods instead of the wooden (bamboo) sticks, as the front lenses may be more easily damaged.
- Do not use any of the optical spray cans containing pressurized liquid air. The pressurized air from these sprays leaves a slight, but difficult to remove, residue.
- Never use acids or ammonia to clean objective front lenses.
- Never try to clean the internal optical surfaces, cameras or adaptor optics.
- Never try to remove dust by blowing into internal areas of the microscope because dust particles may be dislodged and settle into areas that are inaccessible.
back to top ^How to Avoid Contamination
The opening of the binocular tubes should always be protected either with the eyepieces or with dust covers. If no dust covers from the manufacturer are available, aluminum foil is a suitable substitute. The best fundamental method to prevent dust accumulation is to first cover the microscope with two additional plastic bags and then the dust cover supplied by the manufacturer. The microscope should never be located in a position where it could be affected by acidic or alkaline vapors, such as in or near a wet chemical photographic laboratory.
In tropical regions, microscopes frequently experience a buildup of fungus. Although there are over 100,000 fungus species, two members of the genus Aspergillus are believed responsible for most lens deterioration. Optimum growth conditions for these fungi are relatively high temperature and high humidity, but they are more adaptable to lower humidity levels than most other fungi. Fungal contamination can best be minimized by reducing the humidity of the room either by air conditioning or by installing an infrared lamp above the microscope (at a minimum distance of 150 centimeters or 5 feet). Fungi growing on glass surfaces are not attached by roots and can be wiped off, but unfortunately, residual corrosion marks remain and the original lens performance cannot be recovered and the lens must be replaced. The only effective means to avoid fungal damage to optical components is to prevent its growth in the first place.
Conclusions
The ideal microscopy room would be designed specifically for that purpose, and incorporate every mechanism available for limiting contamination by dust, chemical vapors, and other airborne contaminants, as well as isolating the instrument from acoustic and mechanical vibration and temperature variations. This ideal situation is seldom realized, and most microscopes are located in areas subject to a considerable number of environmental deficiencies. Some contamination is unavoidable, due to the rigors of daily use, but at the very least, the microscope should be protected as well as possible during periods of non-use by covering the entire instrument with a suitable cover. Instrument manufacturers and aftermarket suppliers offer a variety of specially designed dust covers. Of the several types of plastic covers available, those made of softer more flexible material are probably less prone to attraction of dust. Lint-free fabric covers are also available, and provide an effective dust barrier that can minimize the need for cleaning.
While the cost of a modern research grade microscope can range from approximately a few tens of thousands to several hundred thousand dollars, if properly used and maintained, the basic optical and mechanical components of the instrument can easily outlive several generations of microscopists. Only if the instrument is used correctly and maintained regularly is it capable of producing the best image data possible. Careless, incorrect operation and maintenance techniques not only result in unreliable and poor quality images, but cause productivity to suffer and the instrument's useful lifetime to be greatly reduced.
Contributing Authors
Rudi Rottenfusser - Zeiss Microscopy Consultant, 46 Landfall, Falmouth, Massachusetts, 02540.
Erin E. Wilson and Michael W. Davidson - National High Magnetic Field Laboratory, 1800 East Paul Dirac Dr., The Florida State University, Tallahassee, Florida, 32310.