


Introduction
Regardless of however poorly a microscope is used, the instrument is almost always capable of producing an image, although the results may leave much to be desired. If certain simple guidelines are followed, it will be a short matter of time before a beginner is able to obtain an image of high quality. In fact, you may be surprised at how easy it is to set up the microscope correctly so that it will produce beautiful, sharp images. The intensive study of any specimen can be a laborious process and requires a significant amount of patience, so before beginning, make sure you are in a comfortable position and that you can look into the eyepieces of the microscope without having either to strain your neck or hunch your back. Also, try resting your forearms on the table so that you can operate the microscope stage movements and focus controls with ease and comfort. Remember, for long sessions on the microscope, always assume a comfortable posture before starting the observations.
Keep in mind when reading the following instructions that because such a wide variety of microscope models are available, it is not possible to cover all the details and exceptions for each specific model in one section. The user should always consult the instruction manual for the particular microscope that is in use. The following guidelines complete a generalized outline and provide a basic foundation for setting up a typical microscope for use with transmitted light and Köhler illumination.
back to top ^Tips on Establishing Köhler Illumination
The most important aspect of configuring a microscope in order to maximize the quality of images is to make certain that the optical system is optimized according to the Köhler theory of illumination. The following tips should help to ensure proper microscope setup.
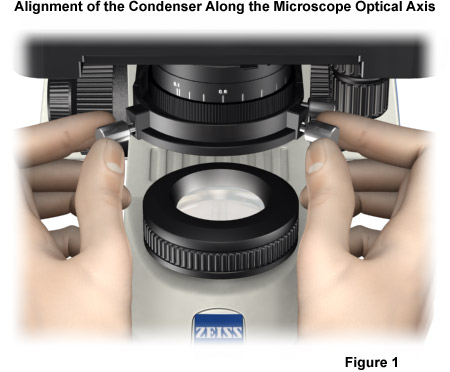
- First, place a stained specimen on the stage and rotate the nosepiece until the objective (preferably a low power 10x or 20x) is in place. Switch on the light source. Open all diaphragms as far as they will go and lift up the condenser as far as it will travel.
- Check the inter-ocular separation of the eyepiece tubes if the microscope has a binocular head, and reset if necessary.
- Focus the specimen with the coarse focus adjustment. The best way to accomplish this is by first bringing the front of the objective to about 5 mm from the slide's surface. Constrict the luminous-field diaphragm, and then, looking through the eyepieces, increase the distance between the specimen and the objective until the image appears sharp. Make the final adjustment with the fine focus knob.
- It may be necessary to adjust the individual eyepieces to accommodate your eyesight if you are using a binocular microscope. At least one eyepiece will have an adjustment collar. To focus this instrument, first keep one eye shut (the eye that is viewing through the adjustable eyepiece), and use the other eye to focus the microscope on a particular detail in the image. Now open the other eye and focus the adjustable eyepiece by turning its collar until the same detail appears just as sharp as before.
- Make sure that the illuminating aperture diaphragm (the condenser iris diaphragm) is wide open. Partially close the illuminated field diaphragm until its image, which will most likely be blurred and possibly off-center, emerges in the field of view.
- Sharpen the image of the illuminated field diaphragm as much as possible by varying the focus of the condenser. If you are working with an Abbe condenser, it is unavoidable that colored halos will frame the image. Aplanatic and achromatic condensers, on the other hand, will furnish much clearer images of the field diaphragm.
- If necessary, center the image of the illuminated field diaphragm. This will be made easier for you if the diameter of the field diaphragm image is lying almost on top of the image of the field of view. The illuminating system, including the illuminated field iris, is aligned on most microscopes during manufacture, and the image of the field iris is centered with the condenser centering screws. In many cases, the diaphragm may be adjusted with its own centering screws.
- Open the illuminated field diaphragm until the entire field of view is bright.
- Remove one of the eyepieces and examine the back focal plane of the objective. If a magnifier provided with phase-contrast kits (often referred to as a phase telescope) is available, use this tool as an aid in viewing the focal plane. Close the illuminating aperture diaphragm in the condenser until its image just begins to appear on the illuminated area in the back focal plane.
- Reinstall the eyepiece and correct the light intensity to a sufficient level by using the brightness control or by inserting neutral density filters into the beam path.
The microscope is now properly adjusted to yield the best images it is capable of producing. If the objective in use is not well corrected, then it may be required (by the time you remove one of the eyepieces) to glance at the back focal plane in order to close the illuminating aperture iris a little bit more in order to obtain a satisfactory image. With older objectives, reducing the working aperture of the objective by even a third of its diameter will possibly work. In these circumstances, experience will be your best guide.
back to top ^Tips on Using Objectives
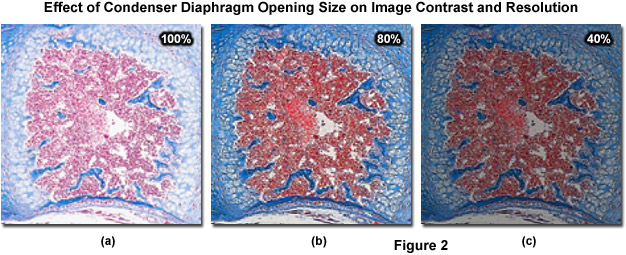
Low-power and high-power objectives differ primarily in the fact that the latter have much higher numerical apertures and therefore greater resolving power. Consequently, upon changing from low to high power, it is necessary to open the condenser illuminating aperture iris diaphragm so that a large angle of the cone of light will give adequate resolution of detail. It is absolutely essential that each objective should be operated with a condenser cone large enough to fill between 70 and 90 percent of the aperture of the objective lens (see Figure 2(b)). If the condenser aperture yields a cone of light that is too small (Figure 2(c)), the result will be a poor image that lacks in detail, with diffraction haloes around the object detail. When you return to using a lower-power objective, the setting should be readjusted. Too large of an illuminating cone (as shown in Figure 2(a)) will create a glare, which will critically reduce image contrast.
It is wise to observe as much of the specimen detail as possible at low magnification. This approach will allow the observer to be able to relate the specimen form and structure more easily to the details that can be seen with the naked eye or a simple hand lens. Once you have gathered all information obtainable from one power, then go on to the next higher power. It is important to proceed in an orderly fashion, especially for those who are just beginning to use the microscope. Beginning students often move on to the higher powers too hastily, making their task of interpreting the specimen structure far more difficult than it should be.
When using a low-power objective, such as one with a magnification in the range of 4x, it is essential that the numerical aperture of the condenser be adjusted to suit that of the objective. It is possible that the condenser will not illuminate the entire field of view, even when the field diaphragm is fully open. In this situation, either you must switch out the condenser for one of a longer focal length or remove the top lens of the condenser (sometimes it is designed to rotate out of the optical axis for this reason). When special objectives designed to supply a magnification of 1x or 1.5x are to be used, a corresponding condenser is vital for success.
If you are examining fine detail close to the resolution limit, oil-immersion objectives with numerical apertures greater than 1 are used. The optimum technique is as follows:
- Establish the point of interest with a lower-power objective and center it in the field of view and focus.
- Place one drop of immersion oil on the top of the coverslip and, if you are utilizing modern parfocal objectives, slowly rotate the oil-immersion objective into place. Confirm that the front lens makes contact with the drop of oil.
- Looking through the microscope, verify that the specimen preparation is relatively in focus, and then use the fine focus to sharpen the image.
- If oil is not being used between the condenser and the slide, then check that the condenser's aperture iris diaphragm is fully open. The oil-immersion objective cannot be operated in this case at its maximum illuminating aperture because the condenser can only deliver an illumination cone having a maximum numerical aperture of about 0.9. Although seldom required, if it is imperative that you reach the maximum possible resolution in transmitted light from an oil-immersion objective of a very high numerical aperture, then the top lens of the condenser must also be oiled to the underside of the slide (a special, high-aperture oil-immersion condenser is necessary). After focusing the condenser, its aperture is adjusted to equal that of the objective.
Köhler illumination requires that only the small area of the specimen that is actually the focus of observation should be illuminated, since any excessive light outside the field of view is distracting. At the same time, when the magnification of the objectives is increased, the size of the illuminated field aperture must be reduced. Otherwise, the image will be degraded by glare, especially when using incident (reflected) light techniques. Another possible mistake that leads to a poor image is overlooking the presence of bubbles in the drop of immersion oil. To ensure that this does not occur, remove the eyepiece and observe the back focal plane of the objective, then move the slide back and forth or partially rotate the nosepiece in effort to dislodge any bubbles. If you are not successful in clearing the bubbles using these tricks, then the oil must be cleared and replaced with a fresh drop.
The microscope system can be configured to be parfocal (two focusing eyepieces are required) for ease of use when changing objectives. The simplest procedure involves setting up a camera for imaging, and then focusing the specimen using the computer monitor to determine what value produces the sharpest image. Next, adjust both eyepieces until sharp images can be observed through each eyepiece. If no camera is present on the microscope, switch to the highest magnification objective and focus carefully using the focusing knobs. Switch to the lowest magnification objective (leaving the focus unchanged) and then refocus the eyepieces.
Contributing Authors
Rudi Rottenfusser - Zeiss Microscopy Consultant, 46 Landfall, Falmouth, Massachusetts, 02540.
Erin E. Wilson and Michael W. Davidson - National High Magnetic Field Laboratory, 1800 East Paul Dirac Dr., The Florida State University, Tallahassee, Florida, 32310.